In the previous article in the series — The best materials to build a homemade filtration mask — we looked at what materials can work best for improvising a face mask.
We recommend you scroll through that article, but if you don’t, here’s the gist of it: thick cotton, folded into 4 layers, is comparable in effectiveness to a surgical mask. Now that we have the material, let’s see how to build a mask.
No sewing — simplest version
This is the ultimate easy-mode, no-skills-required version. All you need is a square patch of cotton and two rubber bands. It takes 30 seconds. You can make it from an old t-shirt (as long as it’s cotton and not too flimsy); stretchy cotton works a bit better for ensuring a snug fit.
But don’t take it from me, here’s the US Surgeon general demonstrating the technique in a sub-minute video.
How you do it:
- fold it to the middle, first from the top, and then from the bottom;
- fold it again to the middle, first from the top, then from the bottom;
- use the two rubber bands to wrap the each side of the cloth;
- fold the sides to the middle, and you have yourself a mask.
Even this extremely simple design can offer significant filtration. But you need to consider a few things — this goes for all improvised face masks, not just this one:
- First, make sure the material is breathable. It’s important to fold it into layers to offer increased protection, but if you can’t breathe through it easily, it’s not good.
- Ensure that the mask is wrapped snugly, maybe even a bit tight around your face. If it starts to hurt a bit after a while, it’s okay — that’s how it’s supposed to be (wearing masks for a long time can be very unpleasant).
- Make sure that the mask doesn’t get wet; if the fabric mask does get wet from another individual’s cough or sneeze, the mask should be removed quickly at a safe distance.
- Don’t touch it with your hands, don’t touch your face, and wash it immediately after using it (a hotter washing machine program should be alright).
- Don’t reuse the rubber bands if possible.
- Read the World Health Organization (WHO) link and Centers for Disease Control and Prevention (CDC) guidelines for mask-wearing.
Make a mask from a T-shirt (no sewing required)
The second easiest version is recommended directly by the CDC, and it basically goes like this:

You will have to sacrifice a cotton T-shirt (again, make sure it’s not too flimsy). Cut a part of it for the cloth, and then cut the middle part of the cloth, leaving two strings, which you will use to tie around your head: one goes around your neck, and the other over the top of your head.
This is an intermediate version: you don’t need any sewing skills or equipment, just T-shirts and scissors.
The same advice carries as above.
Sewn face mask tutorial
This where it gets a bit more interesting. You’ll need:
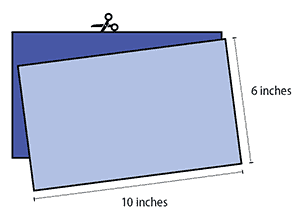
- Two 10”x6” rectangles of cotton fabric (15.2 x 25.4 cm)
- Two 6” pieces of elastic (or rubber bands, string, cloth strips, or hair ties)
- Needle and thread (or bobby pin)
- Scissors
- Sewing machine
Before you start, fabrics should be washed and dried on Hot in order to pre-shrink them.
Step 1.

Cut out two 10-by-6-inch rectangles of cotton fabric. Tightly woven cotton works best — things such as quilting fabric or cotton sheets should do fine. T-shirt fabric will work if you’ve got nothing else. Stack the two rectangles; you will sew the mask as if it was a single piece of fabric.
Step 2.

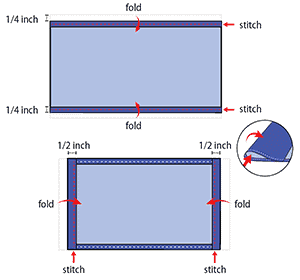
Fold over the long sides a quarter of an inch (0.6 cm) and hem. Then fold the double layer of fabric over half an inch (1.2 cm) along the short sides and stitch down. You can sew by hand or with a sewing machine.
Step 3.

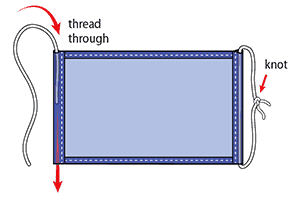
Now it’s time to set the elastic. Pass the elastic through the wider hem on each side of the mask. It should be about 8 inches long (20 cm). These will be the ear loops (like in the first design that used rubber bands) Use a large needle or a bobby pin to thread it through. Tie the ends tight.
If you don’t have an elastic, anything can work. Hair ties or elastic headbands are also okay. If you don’t have that, you can also make the ties from other material and simply tie the mask behind your head.
Step 4.

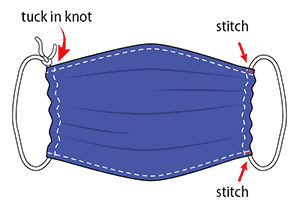
With care, pull the elastic so that the knots are inside the hem. Gather the sides of the mask on the elastic and adjust so the mask fits your face. Then securely stitch the elastic in place to keep it from slipping.
Sewn face mask tutorial (with folds)
If you’d like to build a fancier face mask, with lovely looking folds (that can also slightly improve filtration), there is an excellent guide at the Froedtert Hospital & the Medical College of Wisconsin which you can check out. It’s only a touch more complex, but anyone with basic sewing skills should be able to do it with relative ease. You’ll end up with something like this by following the guide:

Filtration masks will likely become a part of our future whether we like it or not. Containing COVID-19 is only the first step of our fight with this pandemic — we will still need to go out, and as shortages will likely be a problem for a long time now, improvised masks can be very important.
If done properly, they can offer significant protection. If you buy this type of mask, make sure it has at least 2 layers (preferably 4), and is made from denser cotton.
Here are a few more simple videos showing different models:


